Crop Hub
Unleash the Future of Crop Management
All with a simple scan

Welcome to SmartNest, your trusted partner in transforming on field operations. Designed for speed, simplicity, and real-world efficiency, SmartNest redefines how teams interact with their environment - through a scan-and-click interface, bilingual navigation (English/Arabic), and a visually intuitive design.
Dashboard
Your Farm's Pulse at a Glance
SmartNest Dashboard gives you a powerful overview of your farm's performance - combining real-time data, visual insights, and deep traceability. It's a true responsive board - functional whether you're on a mobile, tablet, or desktop.
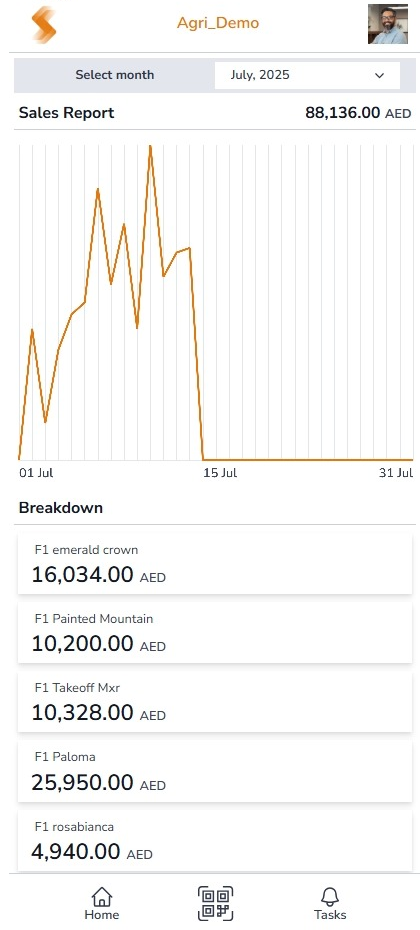
Daily Sales
Quick snapshot of today's sales performance to track momentum and daily revenue.
Daily Harvests
Monitor what's harvested each day to stay aligned with field activity and inventory updates.
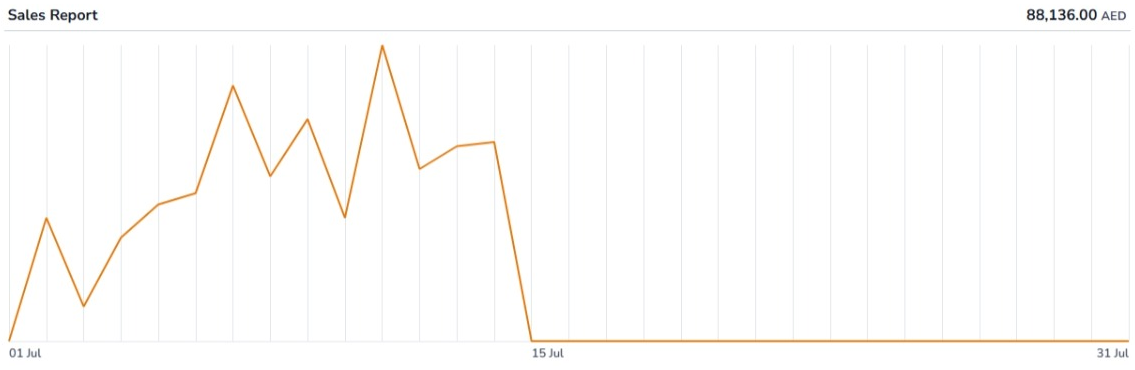
Monthly Sales Overview
Interactive graph shows daily sales across the month—hover to view exact figures and spot trends.
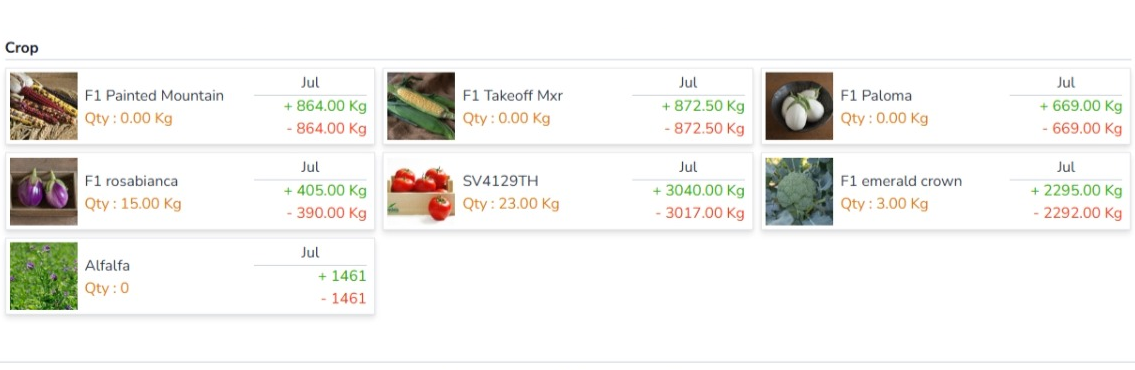
Monthly Crop Flow
Crop variety cards display current stock, total harvested, and total used—giving instant clarity on crop movement.
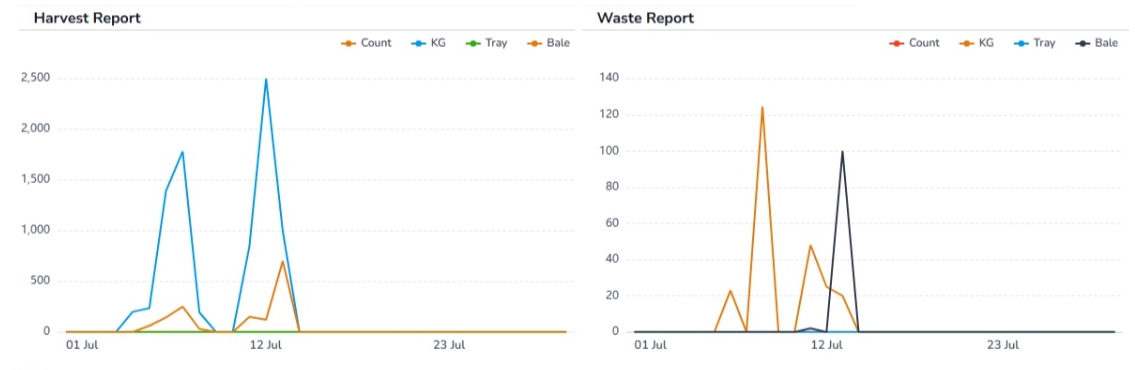
Monthly Harvest & Waste Charts
Visualize total harvests vs. waste across the month—helping you reduce loss and improve planning.


Crop Care Strategy
From Seed to Success
From the moment your crop is planted, every decision matters whether - it's irrigation or fertigation, pruning or harvesting, or any other care activity. Each step plays a vital role in shaping the health, productivity, and success of your crop throughout its life cycle.
You can choose from three Smart Strategy modes:
- Scheduled Approach: Predefined tasks and timelines that automate your crop care routine.
- Manual Approach: On-demand task execution, giving you full control to act when needed.
- Hybrid Mode: A mix of scheduled and manual operations, offering flexibility with structure.
Scheduled


Define your crop schedule:
No more calendars or whiteboards. Just set it once, SmartNest will handle the rest by showing tasks when due, tracking completions, and flagging anything missed.
Simple, smart, and stress-free.
Manual


Record operations in real time:
with a quick scan, a simple selection, and a single click. SmartNest can capture the moment with a photo and keep your records.
Accurate, visual, and up to date
Hybrid
Enable both scheduled and manual modes together for the full flexibility of SmartNest
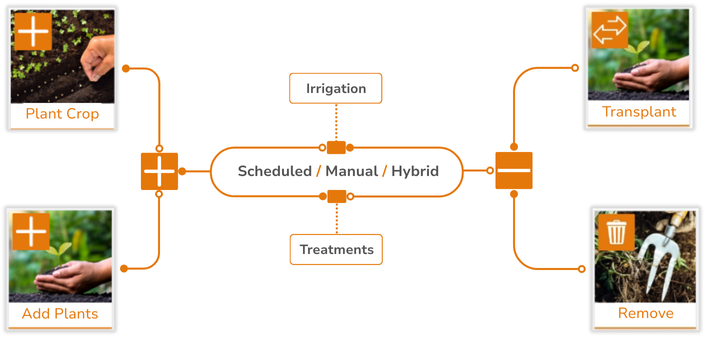
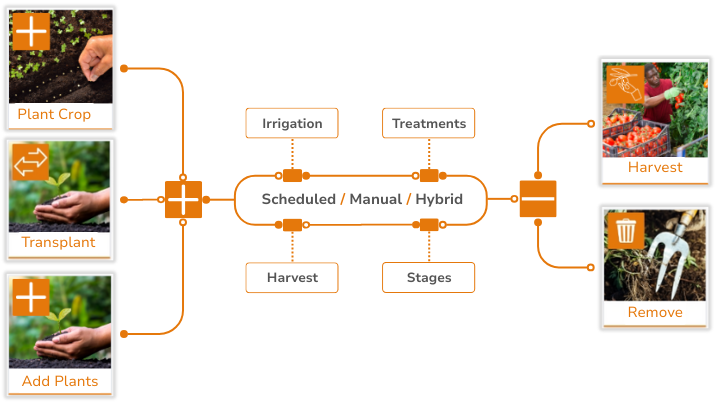
Crop Life Cycle
Flexible and intelligent life cycles tailored for Nursery and Crop Areas
Crop Area Nursery
Life cycle runs from seeding to Transplant or end-of-life.
Crop Area Regular
Life cycle runs from seeding or transplanting to harvest or end-of-life.
SmartNest Features
Your Complete Map to Smarter Farming Operations
Foundation & Setup
Operations & Management
Crop Inventory
Know Your Stock, Down to the Decimal
SmartNest tracks every item and every kilogram—up to the tenth of a kilogram—in real time. Inventory is managed at the crop variety level, giving you instant access to accurate stock data whenever you need it. The Inventory Module manages all types of inventory activities, including harvests, sales, waste, and dispatches.
Core Process
- Access Inventory: From the home page, click on Inventory.
- View Summary: Instantly see your current inventory across all crop varieties.
Smart Integration
- On SmartNest's Inventory Board, users can drill down into individual transactions, including their source and destination - giving full transparency and traceability.
- It's a true responsive board—SmartNest ensures your inventory is accessible and fully functional whether you're on a mobile, tablet, or desktop.
Smart Tips
- Check your inventory regularly to stay ahead of demand, plan sales, and reduce waste.
- Use the drill-down feature to analyze movement and performance across your crop operations.
Crop Areas
Foundation Setup for Smart Farming
The Crop Area module is the foundational setup of your agricultural operation within SmartNest. It is managed by the Application Admin and serves as the core structure upon which all field activities and data collection are built.
Core Attributes
- Area Type: Define whether the crop area is an Open Field, Greenhouse, or Indoor environment.
- Plant Capacity: Specify the total number of plants the area can support.
- Nursery Flag: Mark the area as a nursery if applicable.
- Photo Attachment: Upload a real image of the crop area for easy visual identification and reference.
Smart Integration
- Once a crop area is defined, the admin assigns a SmartNest QR code to it. This QR code becomes the gateway to all future interactions—scanning it allows users to instantly access and manage tasks specific to that area.
- If the Nursery Flag is turned on, SmartNest enables transplanting seedlings from nursery-designated areas to Crop Areas without the nursery flag - ensuring a smooth and traceable transition.
Smart Tips
- One Crop, One Area: Each crop area should be dedicated to a single crop type to ensure accurate tracking and task management.
- Valve-Based Division: For optimal control and clarity, define each valve in your irrigation system as a separate crop area.
Crop Media
Defining the Growing Environment
The Crop Media module is a key part of setting up your farm in SmartNest. Managed by the Application Admin, it allows you to define multiple crop media types tailored to your farm's growing methods and infrastructure.
Core Attributes
- Crop Method: Specify whether the media supports Conventional or Hydroponic farming. This is the most critical attribute, as it informs SmartNest how to tailor its logic and recommendations.
- Name (English & Arabic): Provide bilingual names for clear identification across diverse teams.
- Photo Attachment: Upload a real image of the crop media to help users visually recognize and manage it in the field.
Smart Integration
- This is the point where SmartNest begins to understand your farm's agricultural technology model - Conventional vs Hydroponic, SmartNest adjusts its operational logic, task flows, and future AI capabilities to match the specific needs of each method. This ensures precision control, resource optimization, and alignment with modern agritech standards.
Smart Tips
- You can enable hybrid mode here: For example, if you're using cocopeat in pots but your irrigation and fertigation systems are conventional, define the crop media as Cocopeat with the method set to Conventional.
Assign Crop Media to Crop Area
Smart Linking for Smarter Control
This feature allows you to connect a defined Crop Media to a specific Crop Area, enabling SmartNest to apply the correct operational logic and ensure data consistency across your farm.
Core Process
Scan the QR code of the Crop Area or select it from the list.
- Start Wizard: Click on Operations and choose Add Media to launch a two-step wizard that will guide you through the process.
- Select Media: Choose from visual media cards based on your predefined crop media.
- Add Details: Optionally enter a description and take a photo of the setup.
Smart Integration
- This feature is only available when there is no active crop in the selected Crop Area. This ensures that media assignment happens at the correct stage of the farming cycle. Once a media is assigned, only media-relevant operations will be available - enforcing data integrity and smart operational control.
Smart Tips
- Plan your media assignments carefully as they determine the operational logic and available tasks for each crop area.
- Use the photo feature to document your setup for future reference and team training.
Crop Area Treatments
Preparing the Field & Media to Grow
The Crop Area Treatments module ensures that each crop area is properly prepared before seeding. This step is essential for creating the right conditions for healthy crop development and is intelligently guided by the crop media assigned to the area.
Core Process
Scan the QR code of the Crop Area or select it from the list.
- Start Wizard: Click on Operations and select from the available treatments to launch a two-step wizard.
- Select Treatment: Choose from a list of smartly suggested treatments, shown based on the crop media assigned to the area.
- Add Details: Optionally enter a description and take a photo of the treatment process.
Smart Integration
- If the media is Hydroponic, SmartNest enables operations like media treatment and even media replacement. Otherwise, for Conventional setups, actions are restricted to field preparation only.
- SmartNest ensures only valid treatments are available based on your setup:
- Tilling is not allowed in Hydroponic setups.
- Soil treatments are restricted after seeding in Conventional setups, while Hydroponics allows post-seeding actions like flushing.
Smart Tips
- Always check the available treatments before starting to ensure you're following the correct process for your media type.
- Document your treatment process with photos for quality control and future reference.
Media Replacement
Refreshing the Root of Growth
In hydroponic systems, every media has a lifecycle. The Media Replacement feature allows you to record when a media was last replaced and also switch to a different media type - such as changing from Perlite to Cocopeat - ensuring your system stays efficient and traceable.
Core Process
Scan the QR code of the Crop Area or select it from the list.
- Start Wizard: Click on Operations and select Replace Media to launch a two-step wizard.
- Select Media: Choose from your predefined crop media.
- Add Details: Optionally enter a description and take a photo of the new media.
Smart Integration
- SmartNest only allows media replacement when there is no active crop in the crop area. This ensures that changes are made at the right time, maintaining data accuracy and operational consistency.
Smart Tips
- Plan media replacements during crop-free periods to maintain system efficiency.
- Document the replacement process with photos for quality control and maintenance records.
Plant Crop
Starting the Journey of Growth
After completing all necessary Crop Area Treatments, SmartNest transitions your workflow into the next critical phase - planting your crop. This step is handled with precision, guiding you through crop selection, plant counts, and recording the activity to ensure a successful start to the growing cycle.
Core Process
Scan the QR code of the Crop Area or select it from the list.
- Start Wizard: Select the option Plant Crop to open a three-stage wizard.
- Select Crop: Choose from predefined crop categories such as Tomato, Corn, or Eggplant.
- Select Variety: Based on your selected category, SmartNest will show filtered crop varieties - these are predefined seeds set by your Farm Admin.
- Add Details: Review your selections. Enter the plant count (required), add an optional description, take a photo, and submit.
Smart Integration
- SmartNest only shows the Plant Crop option when a media is already assigned to the Crop Area.
- While entering the number of plants, SmartNest ensures the count does not exceed the available plant capacity defined for that Crop Area.
Smart Tips
- If your crop requires nursery seeding followed by transplanting, make sure to plant in a nursery-designated Crop Area first. For crops like melon that don't require nursery stages, plant them directly in a regular Crop Area.
Schedule Treatment
Automate Your Crop Care with Precision
Every crop category in SmartNest comes with a set of predefined treatments configured by the Farm Admin. The Schedule Treatment module allows you to select and automate these treatments with full flexibility - whether it's multiple times a day or once a year, and even limited to specific timeframes within the day.
Core Process
Scan the QR code of the Crop Area or select it from the list.
- Start Wizard: Select the option Schedule Treatment to open a two-stage wizard.
- Select Treatment: SmartNest will show treatments relevant to the current crop.
- Define Schedule: Select your preferred timing and frequency - SmartNest gives you full control to schedule treatments exactly how you want.
Smart Integration
- Schedule it your way, provide either an end date or a number of treatments, and SmartNest will automatically calculate the rest.
- Treatments will only appear during the time window you've set (e.g., after sunrise).
- If a treatment is missed, SmartNest will mark it as missed based on predefined smart rules1.
Smart Tips
- Plan ahead and let SmartNest do the rest. Once scheduled, treatments are automatically tracked, reducing manual effort and improving consistency.
1 Please refer Appendix - Schedule rules for further details of marking activity as missed.
Schedule Irrigation
Keeps Crop Irrigation Timely and As Needed
SmartNest allows you to schedule irrigation tasks with full flexibility, ensuring your crops receive water exactly when and how they need it. Just like treatments, irrigation can be scheduled from multiple times a day to weekly, and restricted to specific timeframes within the day.
Core Process
Scan the QR code of the Crop Area or select it from the list.
- Start Wizard: Select the option Schedule Irrigation to open scheduling form.
- Define Schedule: Select your preferred duration, timing and frequency - SmartNest gives you full control to schedule treatments exactly how you want.
Smart Integration
- Schedule it your way, provide either an end date or a number of irrigations, and SmartNest will automatically calculate the rest.
- Irrigation will only appear during the time window you've set (e.g., after sunrise).
- If a irrigation is missed, SmartNest will mark it as missed based on predefined smart rules1.
Smart Tips
- Always set the right duration to avoid over- or under-watering. SmartNest uses this input to optimize water usage and maintain crop health.
Transplant
Moving Crops from Care to Growth
Transplanting is a vital step for crops that require critical care during early growth. These crops begin their journey in a nursery, where they are nurtured through seeding and germination. Once ready, they are transplanted into a regular Crop Area to continue their life cycle. SmartNest supports and digitizes this transition, ensuring each transplant is accurately tracked and validated.
Core Process
Scan the QR code of the Crop Area or select it from the list.
- Start Wizard: In Operations Modal, choose Transplant to launch the wizard.
- Select Destination: Scan or select the destination Crop Area.
- Provide details: Enter the number of plants to be transplanted, optionally add a description, take photo and submit.
Smart Integration
- SmartNest tracks both transplant out (from nursery) and transplant in (to regular area) for accurate lifecycle management.
- Transplanting is only allowed from nursery to regular Crop Areas.
- SmartNest ensures you cannot exceed the available plant count in the nursery or the maximum capacity of the destination area.
Smart Tips
- Plan your transplanting window carefully to avoid stress on seedlings and ensure a smooth transition to the main field.
Perform Treatment
Apply Crop Care with Simplicity and Control
SmartNest allows treatments to be performed either manually or through a scheduled task, giving farmers flexibility while ensuring accurate tracking. Whether it's fungicide, pesticide, or any other crop care activity, SmartNest makes the process simple and smart.
Core Process
Scan the QR code of the Crop Area or select it from the list.
Scheduled
- Automatically appears as a pending task based on current time and date.
- Click on to open the task, add an optional description and photo, and submit.
Direct
- Select Direct Irrigation from the operations modal.
- Step 1: Choose the treatment from the list of predefined options.
- Step 2: Enter an optional description, take a photo, and submit.
Smart Integration
- Scheduled Treatments appears automatically within the defined time window and are shown as pending.
- SmartNest will mark treatments as missed based on predefined Schedule rules1.
Smart Tips
- Use manual mode for unexpected treatments or field-specific needs.
- Scheduled mode ensures consistency and helps maintain a complete treatment history.
Perform Irrigation
Smart Watering, Manual or Scheduled
SmartNest offers two flexible methods to record irrigation activities: Manual and Scheduled. Whether you're logging real-time irrigation or following a predefined schedule, SmartNest ensures accurate tracking and timely execution.
Core Process
Scan the QR code of the Crop Area or select it from the list.
Scheduled
- Automatically appears as a pending task based on current time and date.
- Click on to open the task, update duration in minutes if needed, add an optional description and photo, and submit.
Direct
- Select Direct Irrigation from the operations modal.
- Enter the duration in minutes, add an optional description and photo, and submit.
Smart Integration
- Scheduled irrigation tasks appear automatically within the defined time window and are shown as pending.
- SmartNest will mark the task as missed based on predefined Schedule rules1.
Smart Tips
- Use scheduled irrigation to automate routine watering and ensure consistency.
- Manual mode is perfect for on-the-go updates and unexpected irrigation needs.
Staging
Track Crop Progress Step by Step
Every crop follows a stepped growth cycle, and SmartNest makes it easy to manage. By default, SmartNest defines five standard stages1 for every crop, regardless of type. The Farm Admin can further customize these stages and their order to match the crop's actual lifecycle. From there, SmartNest enables controlled, step-by-step stage progression for farmers.
Core Process
Scan the QR code of the Crop Area or select it from the list.
- Start Activity: In operations modal, choose Update Stage to launch the wizard.
- Click on Next Stage: SmartNest will display all defined stages and smartly activate the next stage in sequence—just click to proceed.
- Add Details: Optionally enter a description, take a photo, and submit.
Smart Integration
- SmartNest only allows progression to the next stage based on the current stage and the predefined order set by the Farm Admin—ensuring accurate tracking and preventing skipped steps.
Smart Tips
- Timely stage updates are crucial. They help track how the crop was irrigated and fertigated during each phase, enabling better analysis and future planning.
Remove Plants
Keep Your Crop Count Accurate
Every crop in SmartNest is tracked by its plant count, and it's common for some plants to die or become unhealthy during the growing cycle. The Remove Plant feature helps you keep your records accurate by logging these changes in real time.
Core Process
Scan the QR code of the Crop Area or select it from the list.
- Start Activity: From the operations modal, choose Remove Plant.
- Add Details: Add number of plants being removed and optionally enter description, take a photo, and submit.
Smart Integration
- SmartNest logs every removal and automatically updates the plant count for the Crop Area—ensuring your data stays clean, current, and reliable.
Smart Tips
- Regularly update plant counts to maintain accurate records and support better analysis of crop health and performance.
Add Plants
Maintain Accurate Plant Counts
While rarely used, the Add Plants feature is essential for maintaining an accurate plant count—especially in cases where additional seedlings are introduced outside the farm or corrections are needed in the crop record.
Core Process
Scan the QR code of the Crop Area or select it from the list.
- Start Activity: From the operations modal, choose Add Plants.
- Add Details: Add number of plants being added and optionally enter description, take a photo, and submit.
Smart Integration
- SmartNest updates the plant inventory in real time, ensuring your crop data reflects the actual number of plants in the field.
- Addition is restricted—you can only add plants up to the maximum capacity of the Crop Area minus the current plant count.
Smart Tips
- Use this feature to correct plant counts or log late additions to the crop area for complete and accurate records.
Add Photo
Capture Visual Insights Instantly
Though simple, the Add Photo feature is a powerful tool for visually documenting crop growth, field conditions, and any issues that arise. It helps build a visual timeline of your crop's journey, supporting better analysis and decision-making.
Core Process
Scan the QR code of the Crop Area or select it from the list.
- Select Photo: From the operations modal, choose Add Photo.
- Capture & Review: SmartNest will display the captured photo. If satisfied, go ahead and submit. If not, click again to retake.
Smart Integration
- SmartNest logs every photo and automatically updates the visual history for the Crop Area—ensuring your data stays clean, current, and reliable.
Smart Tips
- Use photos regularly to build a visual history of your crop. It's a simple step that adds powerful context to your records.
Remove Crop
Closing the Chapter, Preparing for the Next
When it's time to say goodbye to your current crop and prepare the Crop Area for a new cycle, SmartNest provides a simple and secure way to remove the crop while preserving its full history.
Core Process
Scan the QR code of the Crop Area or select it from the list.
- Select Remove Crop: From the operations modal, choose Remove Crop.
- Confirm Action: Check the confirmation and submit to Finalize the removal to free the Crop Area for future use.
Smart Integration
- SmartNest asks for consent before removing a crop to prevent accidental deletion.
- Once removed, the Crop Area is unlocked and ready for a new crop, while all operations linked to the previous crop are closed.
- The full crop record is preserved, ensuring historical data remains accessible.
Smart Tips
- Always refer to your previous crops for insights and lessons learned. Visit the Crop View section to explore your crop history and improve future planning.
Harvest
Track What You Grow, Accurately
Harvesting is directly linked to your crop inventory and is a key step in closing the crop cycle. SmartNest supports four types of harvest units: Count, Weight, Bales, and Trays, allowing you to record harvests in the format that best suits your crop type.
Core Process
- Scan the QR code of the Crop Area or select it from the list.
- Select Harvest: From the operations modal, choose Harvest.
- Add Details: Add Harvested quantity, optionally enter description, take a photo, and submit.
Smart Integration
- SmartNest automatically identifies the harvest type:
- If it's a full-plant harvest (e.g., lettuce), the plant count in the Crop Area will be adjusted.
- For other harvest types (e.g., weight, fruits), the plant count remains unchanged.
- SmartNest updates your inventory records based on the harvest data, ensuring accurate stock tracking.
Smart Tips
- Use photos to visually document harvest quality and quantity for future reference.
Sales
Turn Your Harvest into Revenue
SmartNest makes it easy to convert your harvested inventory into sales with just a few taps. Whether you're selling by count, weight, trays, or bales, the process is fast, accurate, and fully traceable.
Core Process
- Select Sales: From the home screen, tap on Sales. SmartNest displays all available inventory along with quantities.
- Select Item: Choose the item you want to sell.
- Apply Pricing: Enter the predefined discount (if any) and the total price.
- Add Info: Optionally include a description and photo. Submit.
Smart Integration
- Sales are directly linked to your crop inventory, ensuring real-time updates and accurate stock levels.
- SmartNest logs every sale with full traceability, including item, quantity, pricing, and timestamp.
Smart Tips
- Use photos to document quality and packaging for each sale.
- Review your sales history to analyze trends and improve pricing strategies.
Dispatch
Send Crops to the Kitchen, Not the Market
For family farms where crops are grown for home use rather than commercial sale, SmartNest offers the Dispatch feature. It works just like the sales module but without pricing—enabling end-to-end inventory tracking so you always know what's available and tracks what's sent to the family kitchen or other internal destinations.
Core Process
- Select Dispatch: From the home screen, tap on Dispatch. SmartNest displays all available inventory along with quantities.
- Select Item: Choose the item you want to dispatch.
- Add Info: Enter Quantity and optionally include a description and photo. Submit.
Smart Integration
- SmartNest ensures accuracy by preventing dispatches that exceed the available inventory - keeping your records clean and reliable.
- SmartNest updates your inventory in real time and maintains a full dispatch history for transparency.
Smart Tips
- Use dispatch records to track family consumption, plan future planting, and reduce waste.
- Photos help document quality and packaging for internal use.
Waste
Track What's Lost to Improve What's Grown
For every farm, some loss is inevitable - whether due to spoilage, damage, or quality issues. SmartNest's Waste feature helps you log these events accurately, keeping your inventory clean and your insights sharp.
Core Process
- Select Waste: From the home screen, tap on Waste. SmartNest displays all available inventory along with quantities.
- Select Item: Choose the item you want to waste.
- Add Info: Enter Quantity and optionally include a description and photo. Submit.
Smart Integration
- Waste entries are logged enabling end-to-end inventory tracking so you always know what's available and what's been lost.
- SmartNest ensures accuracy by preventing waste entries that exceed the available inventory keeping your records reliable and actionable.
Smart Tips
- Use waste records to analyze loss patterns, improve crop handling, and reduce future waste.
- Photos help document causes and support better decision-making.
Appendix
Schedule Rules
Table summarizing SmartNest schedule rules for marking treatments as missed:
| Schedule Type | Smart Rule to Mark as Missed |
|---|---|
| Multiple Times a Day | After the scheduled end time |
| Daily | After the scheduled end time |
| Weekly | After the scheduled end time and 2 days from the scheduled date |
| Monthly | After the scheduled end time and 1 week from the scheduled date |
Default Stages
Table list of predefined default stages:
| Order | Stage |
|---|---|
| 0 | Planting |
| 1 | Growth |
| 2 | Flowering |
| 3 | Fruiting |
| 4 | Harvesting |